@sushruth The 6. x kernel version has been processed internally and is expected to be released in the second quarter.Thank you for your support.
G
Posts made by george
-
RE: Ubuntu kernel upgradesposted in Ubuntu
-
RE: Coolpi 4B ubuntu supportposted in News
@jugg 不好意思,手上目前没有4K的设备,要晚一点才能测试。你可以尝试修改如下配置:
/etc/profile.d/gst.sh
默认的最大分辨率改为你目前sensor的最大分辨率。
export GST_V4L2SRC_MAX_RESOLUTION=3840x2160 -
RE: Coolpi 4B ubuntu supportposted in News
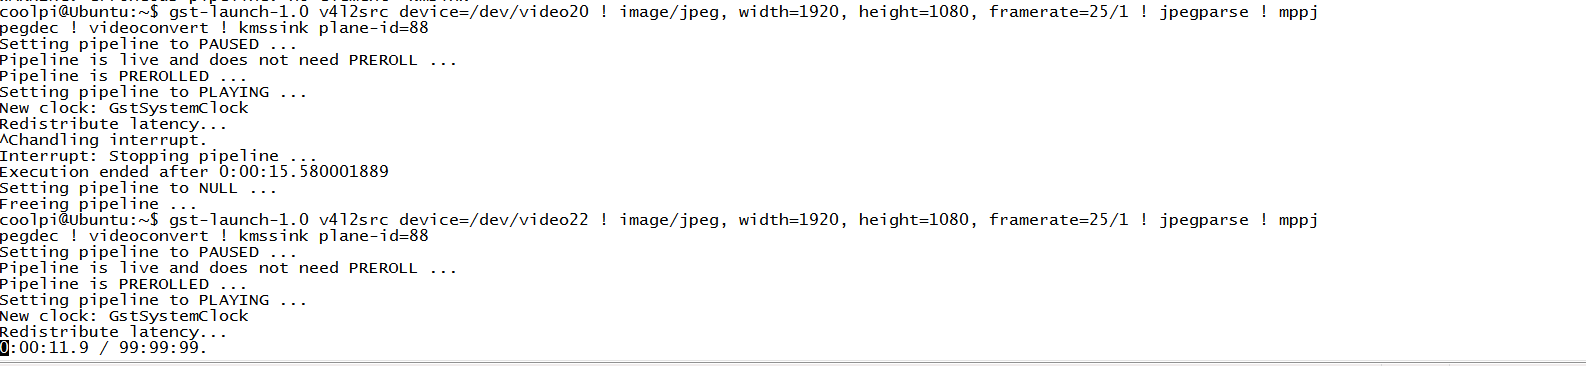
@jugg 我这边测试0306的固件也是正常的。两路1080P/25FPS。
gst-launch-1.0 v4l2src device=/dev/video20 ! image/jpeg, width=1920, height=1080, framerate=25/1 ! jpegparse ! mppjpegdec ! videoconvert ! fpsdisplaysink sync=false signal-fps-measurements=true

gst-launch-1.0 v4l2src device=/dev/video22 ! image/jpeg, width=1920, height=1080, framerate=25/1 ! jpegparse ! mppjpegdec ! videoconvert ! fpsdisplaysink sync=false signal-fps-measurements=true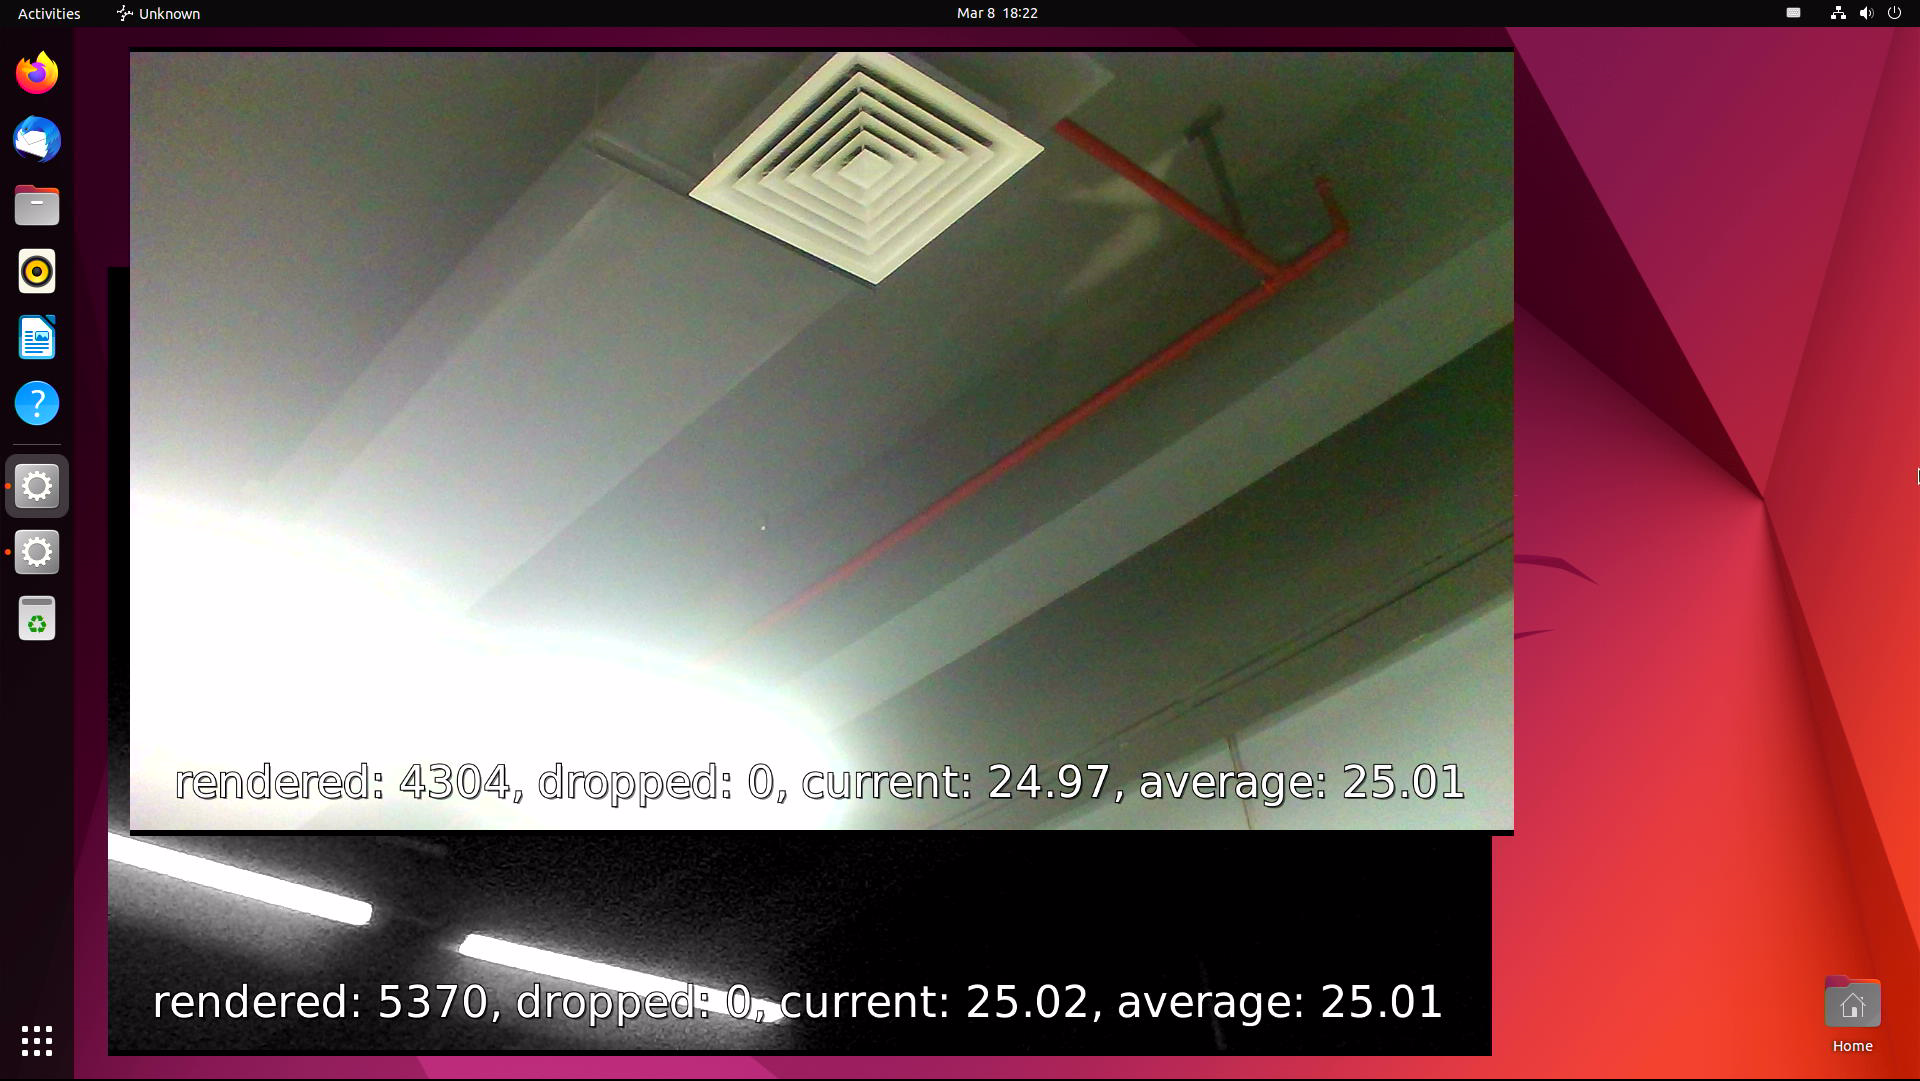
-
gstreamer video frameworkposted in Ubuntu
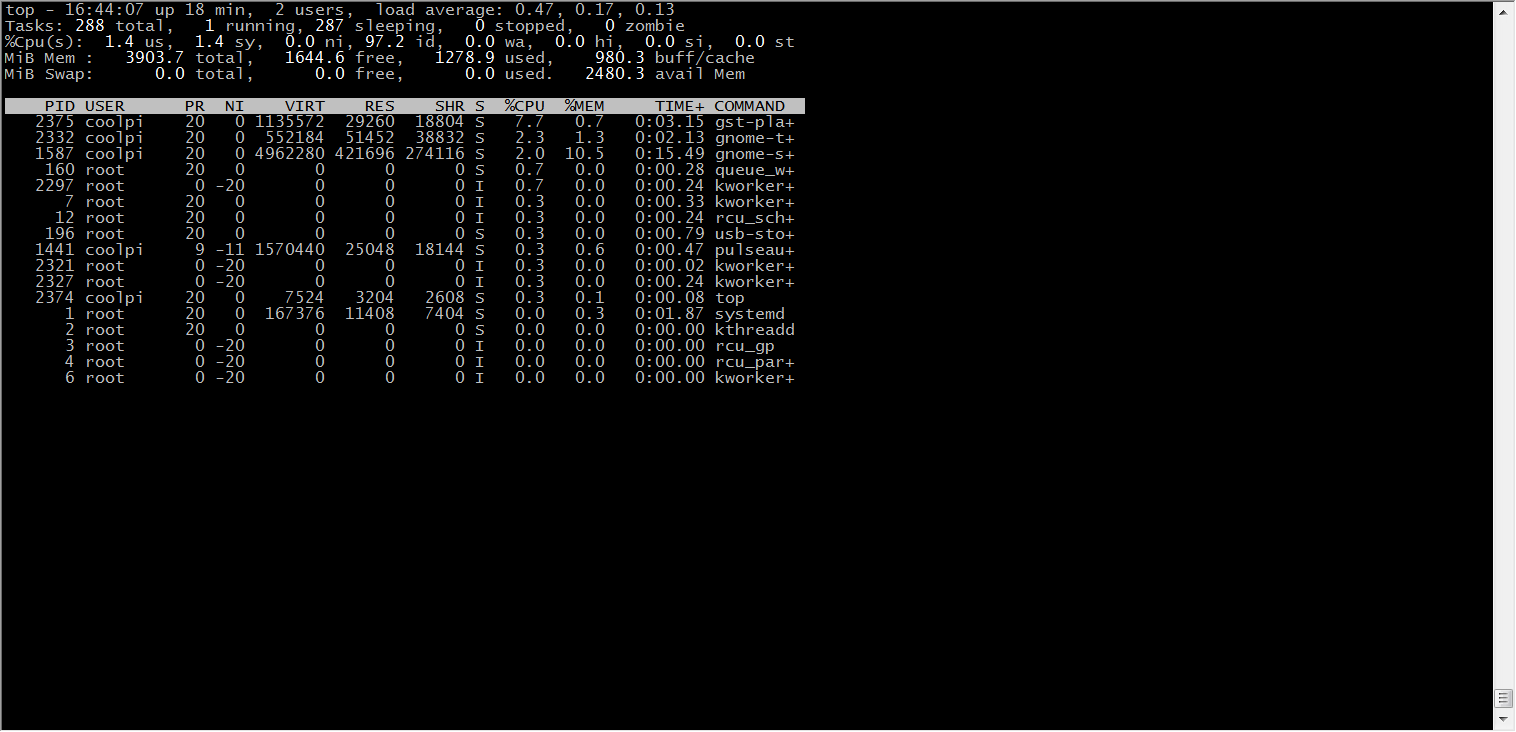
The latest ubuntu22.04 firmware(20230303-ubuntu-22.04-preinstall-desktop-arm64) integrates ffmpeg and gstreamer video frames, and can call the hardware codec module of Rockchip, which can greatly improve the video codec performance of the device and reduce the CPU load.
-
With kmssink, the CPU utilization of 4K video playback is reduced to about 10%.The disadvantage is that it occupies one layer.
-
The following command can obtain layer information.
sudo cat /sys/kernel/debug/dri/0/state | grep "plane"- Use the following command to play the video and replace xxx.mp4 with the actual path. 88 represents the layer, kmssink only supports the display of Esmart layer.
gst-play-1.0 xxx.mp4 --videosink='kmssink plane-id=88'- You can also use other plug-ins, such as xvimagesink glimagesink waylandsink, etc.

-
-
RE: 双4K usb摄像头posted in Hardware
@jugg 两路4K解码+1路编码这个从性能来讲是没有问题的。接口部分后续主要以GST为主,这个目前还有一些适配问题在处理中。等后续出稳定版本会在论坛发布。
-
RE: 音视频编解码的demoposted in Ubuntu
@jugg 谢谢你的提议,最近一直在处理GST的兼容性问题,这个弄完以后会考虑上一些实例包。先上传一些底层接口的文档,你可以先看一下。
Rockchip_Developer_Guide_MPP_CN.pdf
Rockchip_Developer_Guide_MPP_EN.pdf
Rockchip_Developer_Guide_RGA_CN.pdf
Rockchip_Developer_Guide_RGA_EN.pdf
Rockchip_User_Guide_Linux_Gstreamer_CN.pdf
Rockchip_User_Guide_Linux_Gstreamer_EN.pdf -
RE: 音视频编解码的demoposted in Ubuntu
@jugg 可以使用FFMPEG,解码部分已经集成硬件解码,GST部分插件也可以调用到rkmpp解码,也可以直接调用RKMPP,这个需要自行研究一下文档。关于裁剪缩放效率问题可以考虑使用RGA硬件加速模块。
-
RE: Pi4B使用realsense深度相机开机默认识别为USB2.0设备。重新插拔后才能识别为USB3.0设备。posted in Ubuntu
@Mcfly 从现象看应该是UBOOT下USB驱动不够完善导致的,简单的方法关闭uboot下USB设备的注册,到内核以后再加载USB驱动。或者等我们更新UBOOT代码,这个因为手上暂时没有设备,会稍微慢一些。
-
RE: Coolpi 4b Ubuntu20.04 原生系统posted in Ubuntu
@myhexb 这个是镜像没有制作成功。如果有读卡器可以先格式化一次卡,然后再制作,闪迪的卡我一直在用,没有什么问题。
-
RE: Introduction to COOL PI CM5 interfaceposted in Pi CM5
@Twsuts 正常需要初步验证和测试完成以后,底板资料才可以开放。目前核心板已经是稳定版本。
-
RE: Display Portposted in Hardware
@lej40 The DP interface cannot be configured as a USB3.1 interface. If two USB3.1 interfaces are not enough, it can be extended by using an external USB HUB. Two USB2.0 connectors are reserved on the back of the CP4 machine for users to use.
-
RE: Introduction to COOL PI CM5 interfaceposted in Pi CM5
@顾真牛 有标准PCIE接口,USB3.0不够可以扩展。外置4个USB接口,2个U2 两个U3。一般场景可以满足。
-
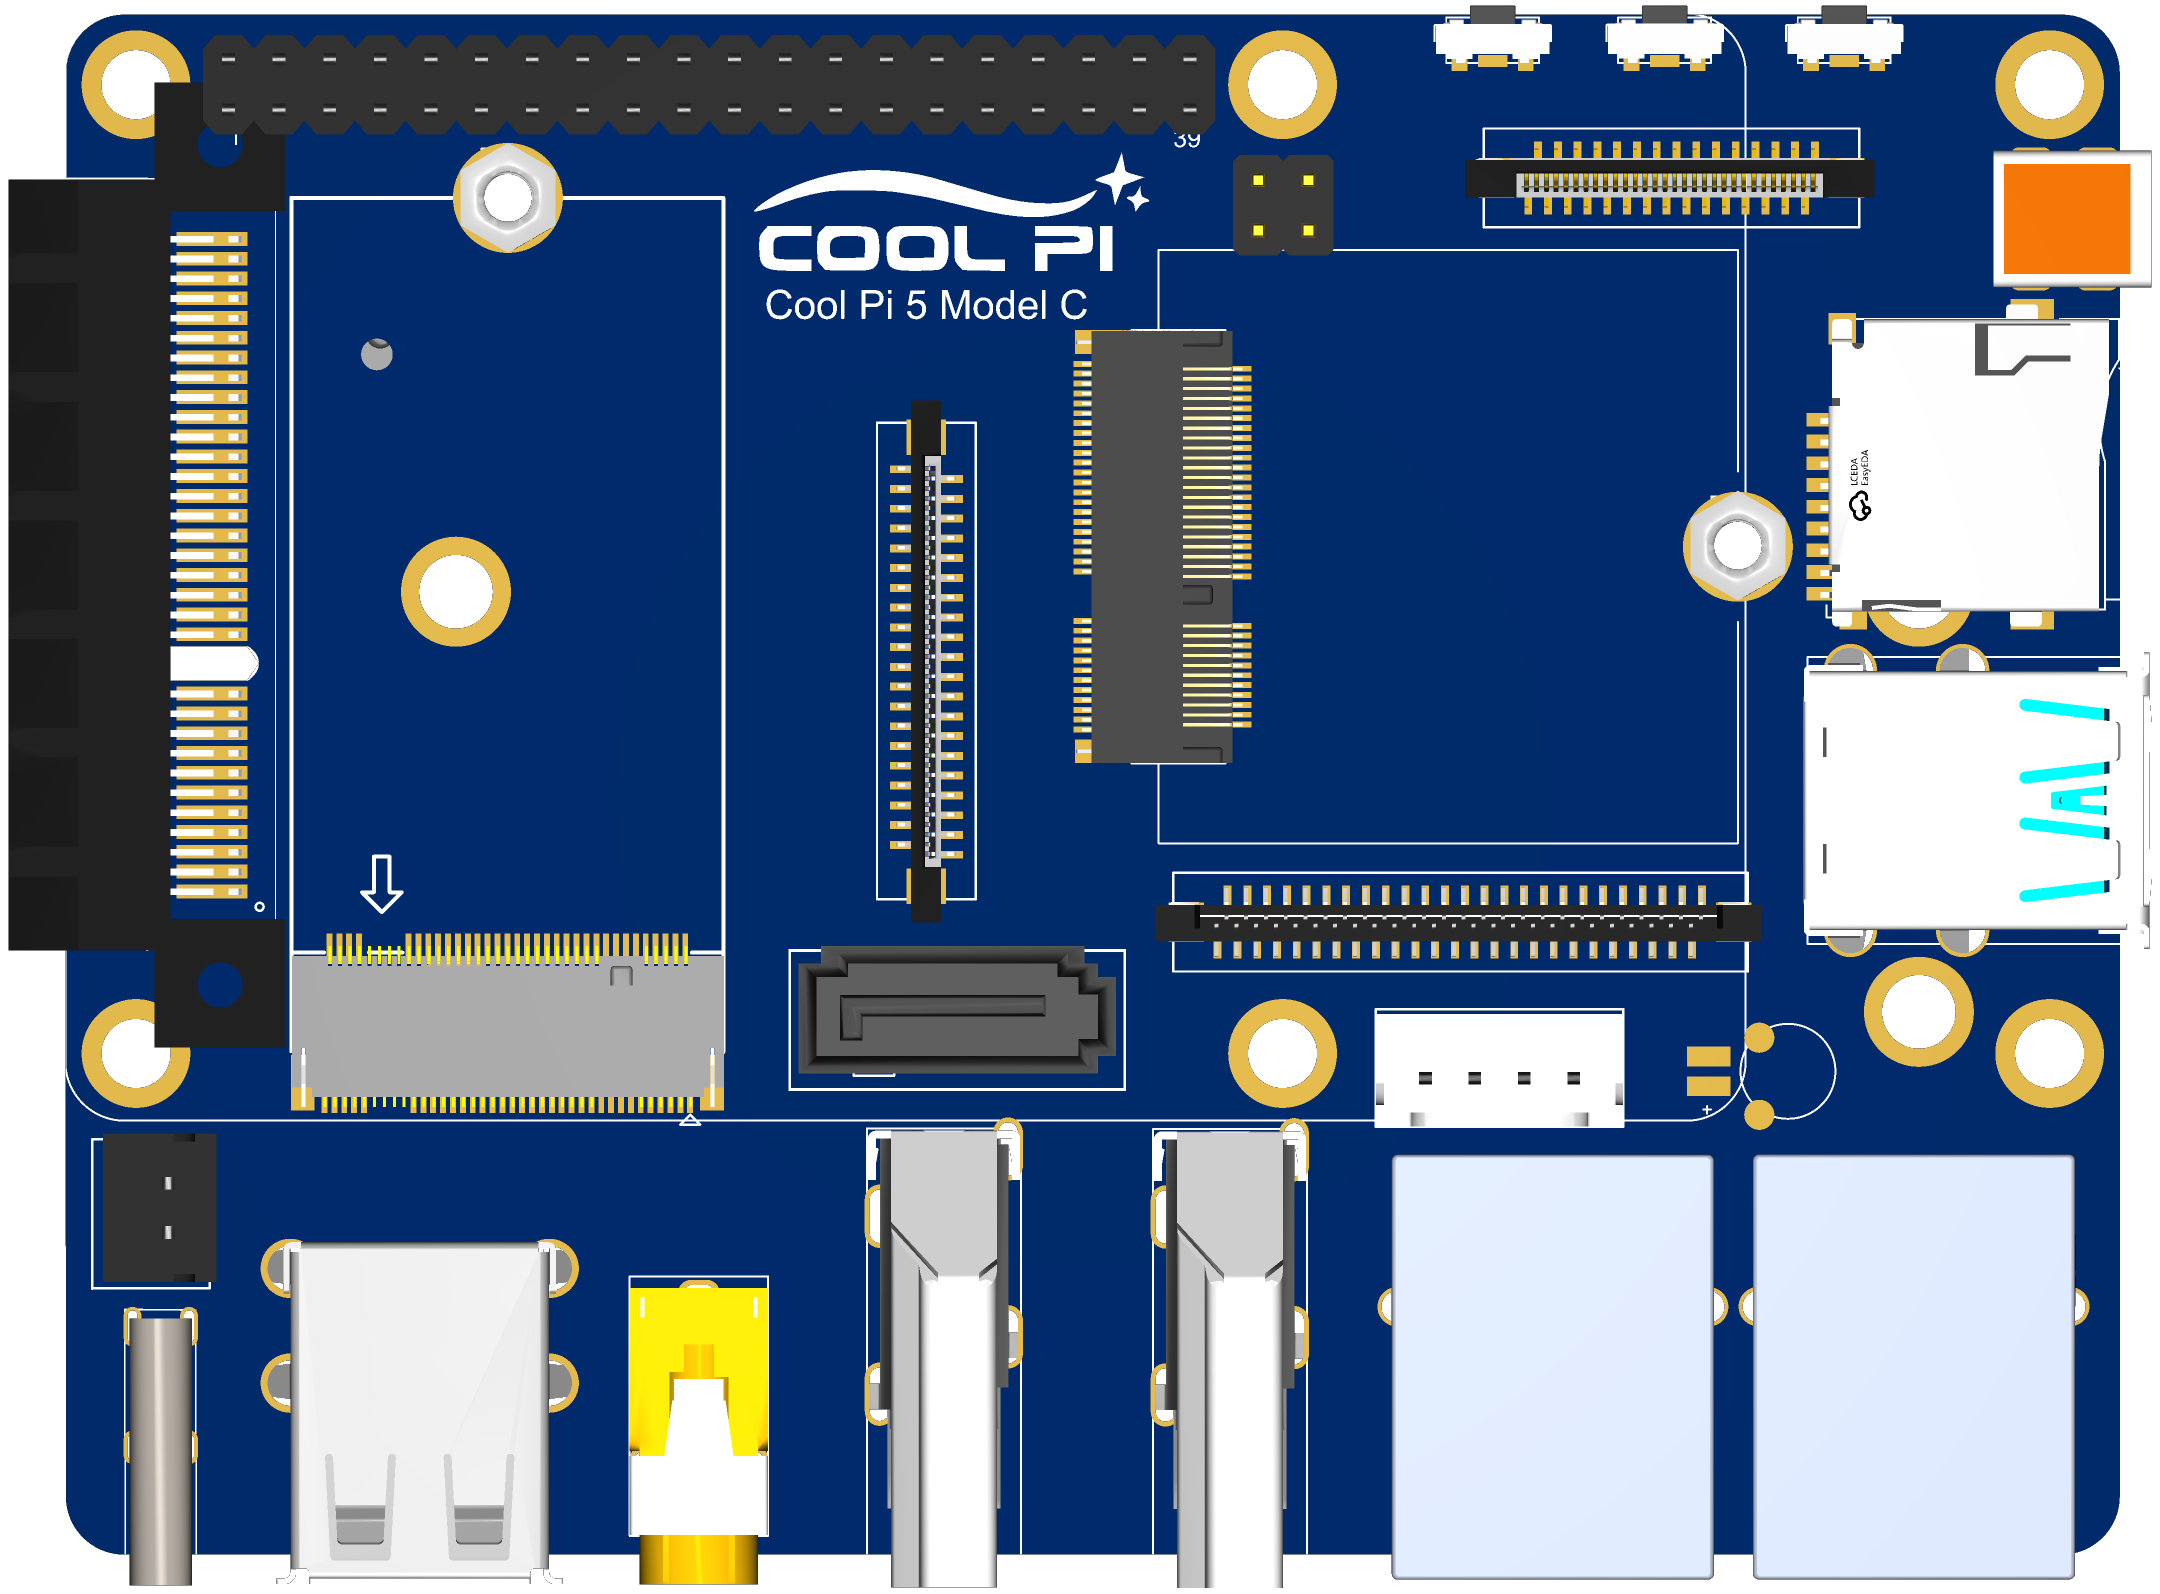
Introduction to COOL PI CM5 interfaceposted in Pi CM5
Top-level interface
-
The 2X20 pin interface is compatible with CP4 and integrates multiple UART, I2C, SPI, CAN and other functions.
-
Three function keys are PWR, RST and LOADER.
-
2X2 PIN POE connector,such as CP4.
-
30pin fpc vertical connector can directly drive standard 30PIN EDP interface LCD. Resolution up to 3840 * 2160
-
The MICRO HDMI-RX interface can support up to 4KP60 video signal input.
-
TF card with self-locking.
-
Two native USB3.0 interfaces, one of which supports OTG function.
-
Two Gigabit Ethernet interfaces, one of which supports POE function.
-
Two HDMI2.1 interfaces with a maximum resolution of 8K.
-
Stereo headphone stand with MIC input function.
-
Two native USB2.0 interfaces.
-
One TYPEC power supply interface, consistent with CP4.
-
The external power interface of 2PIN can support DC power input.
-
1 standard PCIE 4X connector, currently only supports PCIE3.0 2X/1X mode.
-
SSD interface, only PCIE-M2-2242 size hard disk is supported.
-
Standard 7PIN SATA3.0 interface, 4PIN power interface.
-
M.2 WIFI module interface, supporting multiple general WIFI modules.
-
Dual MIPI LCD interfaces support simultaneous output of two MIPI interface LCDs. The resolution of a single LCD is up to 1920 * 1200. It supports the MIPI DSC function.
-
Four independent MIPI camera interfaces support four camera inputs at the same time. It can be configured as 2X4LINE or 4X2LINE mode.
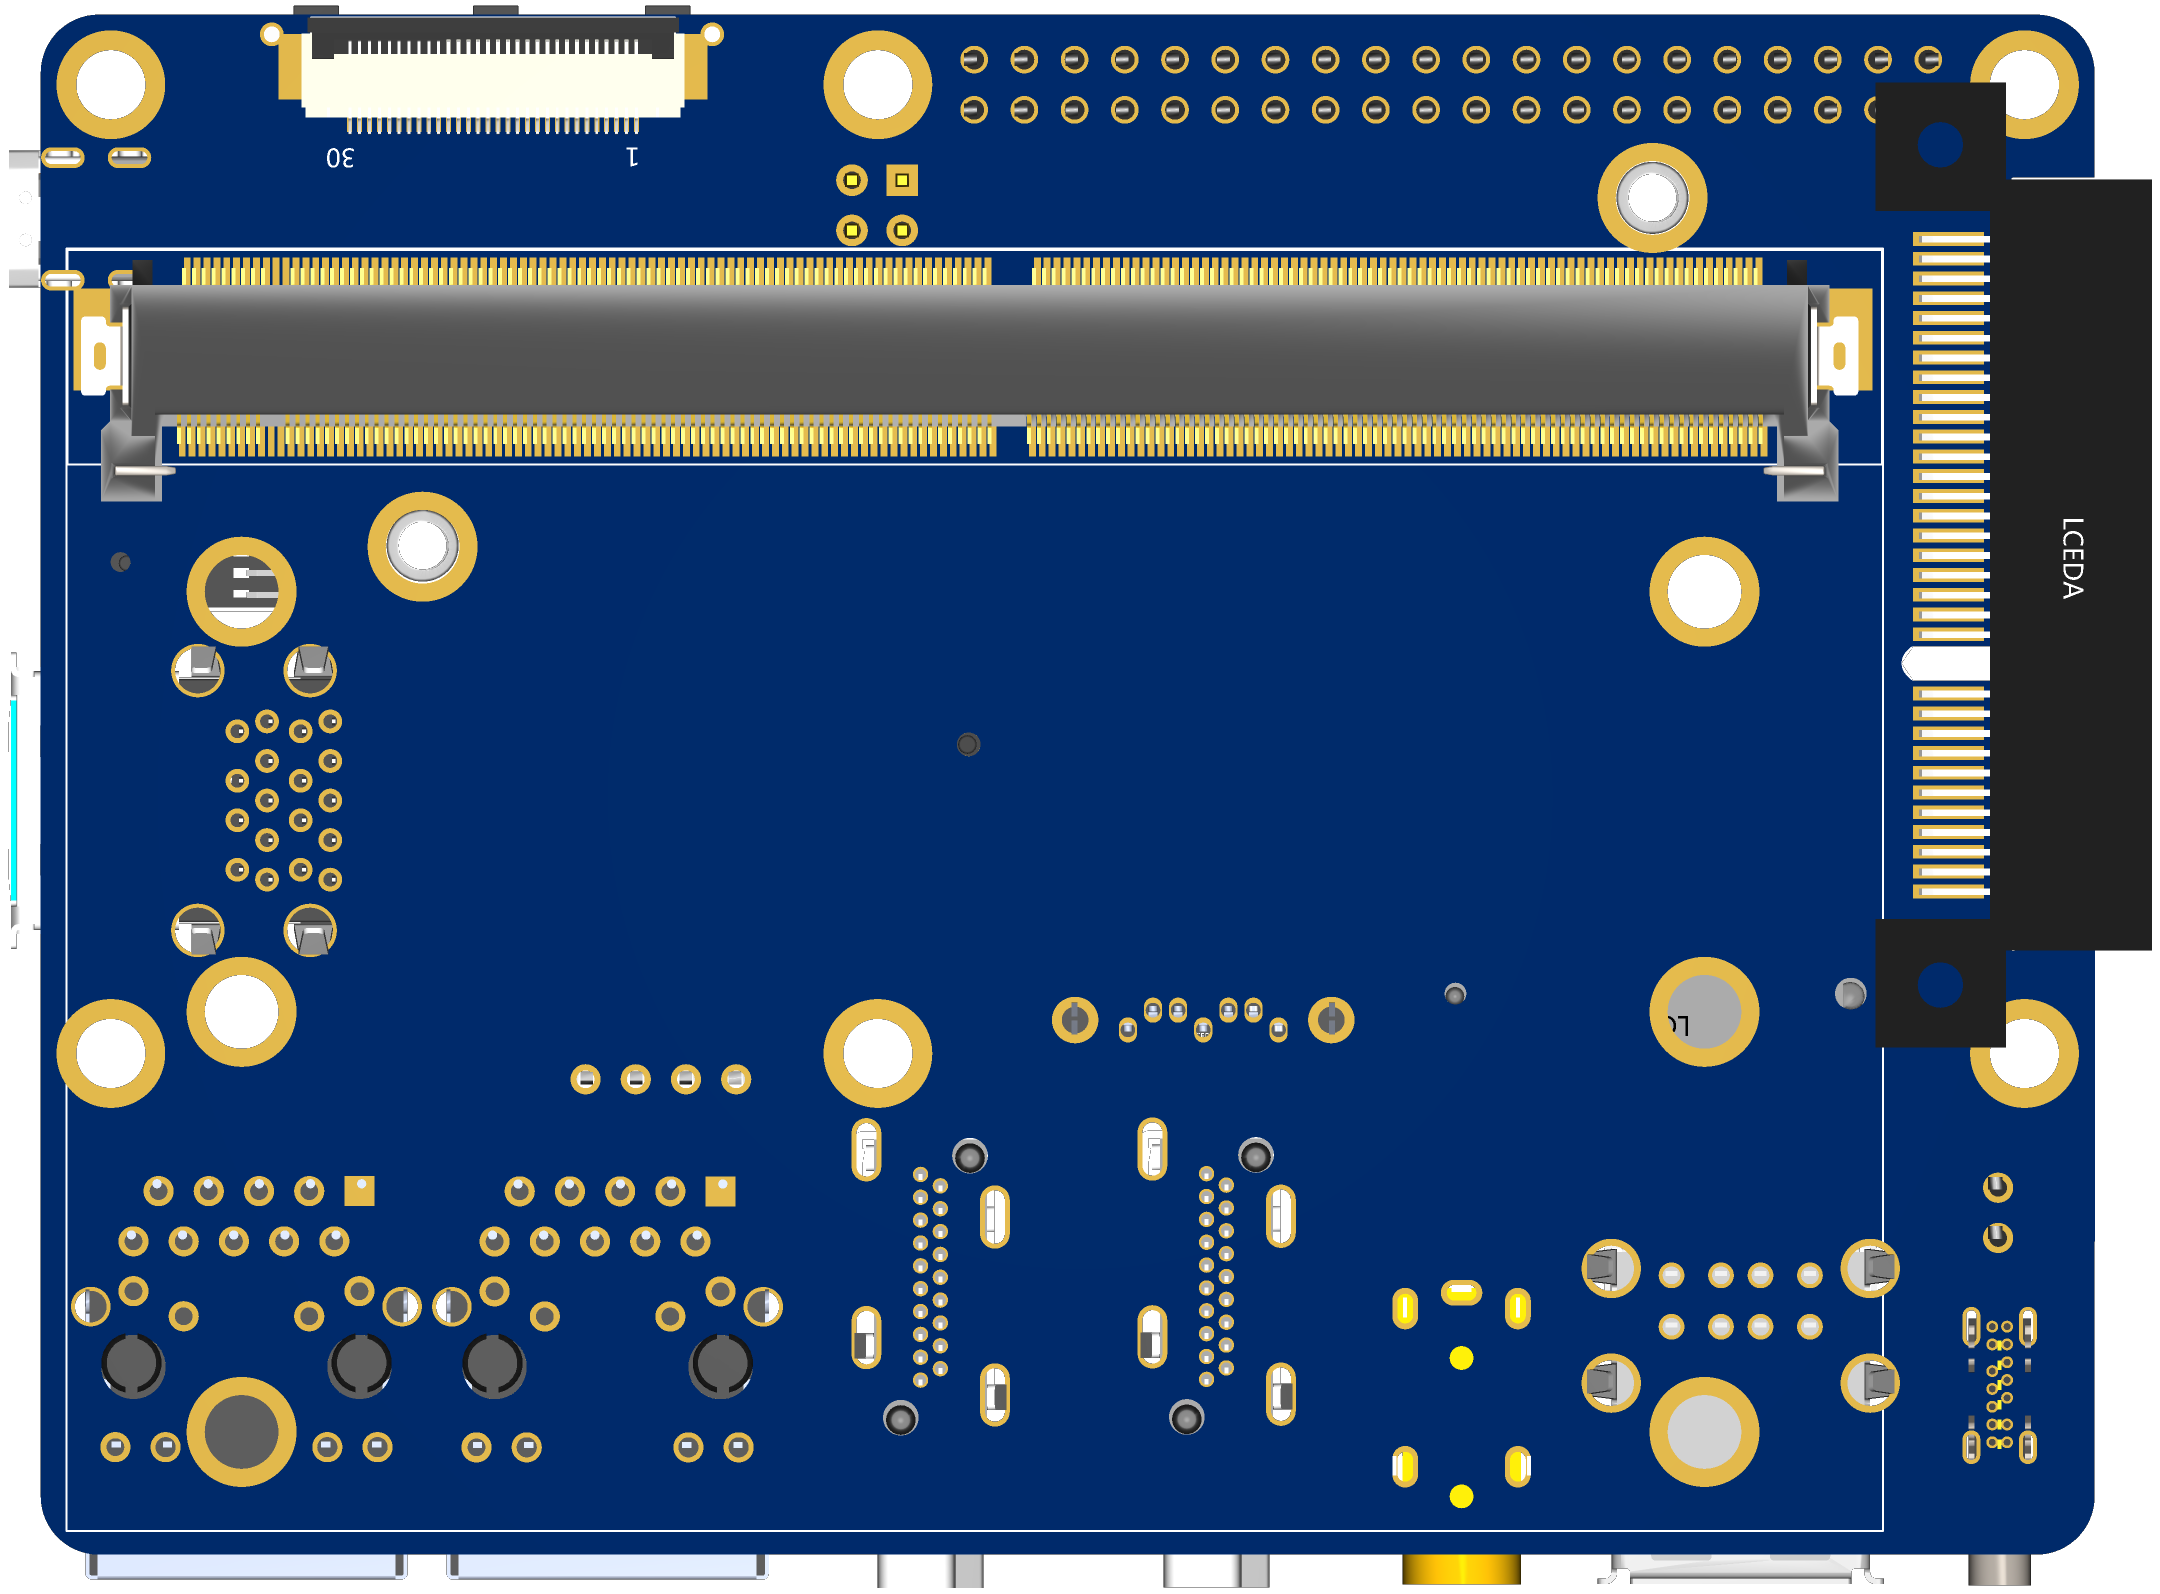
Bot-level interface
-
One 30PIN EDP interface can directly drive LCD output.
-
MXM 314PIN core board connector.
Welcome to put forward good suggestions. We can consider revising them.
-
-
RE: coolpi 4b support ov5647 camera moduleposted in Peripheral
@大法师 The latest ubuntu22.04 image can already support this camera.
-
20230210-ubuntu-22.04-preinstalled-desktop-arm64-coolpi.rar
-
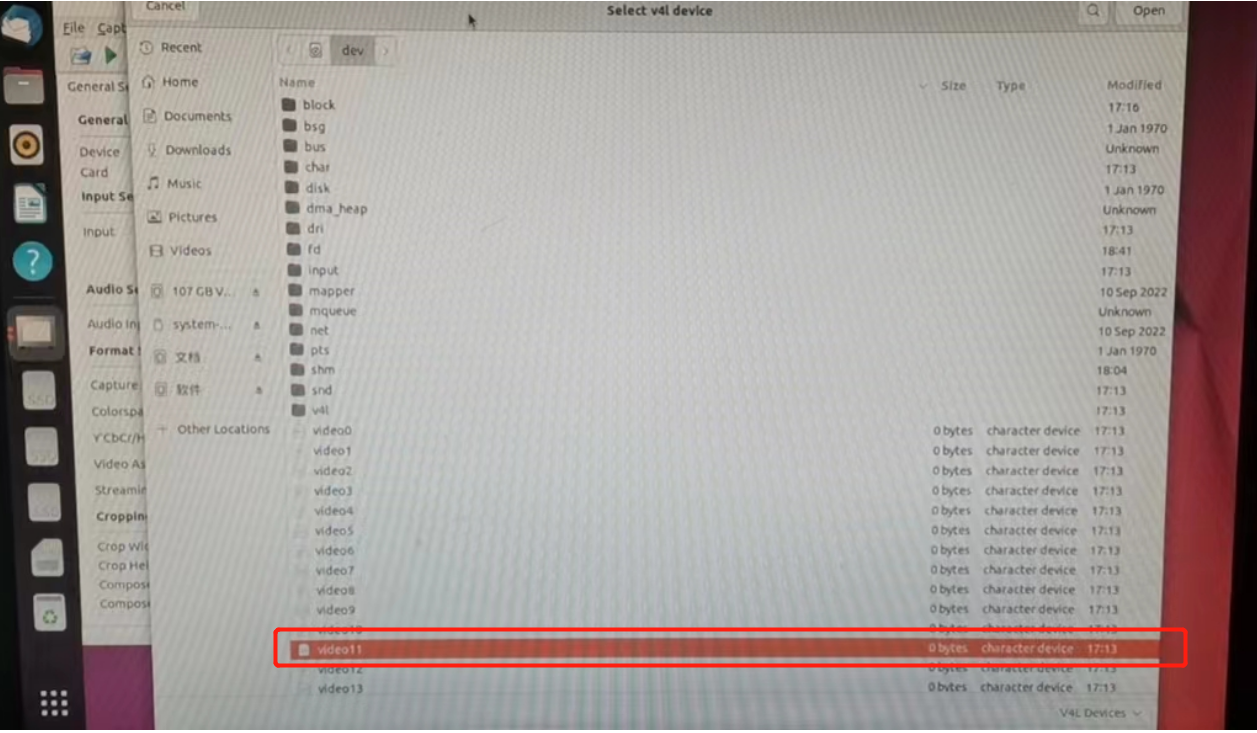
V4L2-TEST can start the camera by operating the video11 node
 0ef06ad8-64c6-4d7c-b1a2-4f62d01ea452-image.png
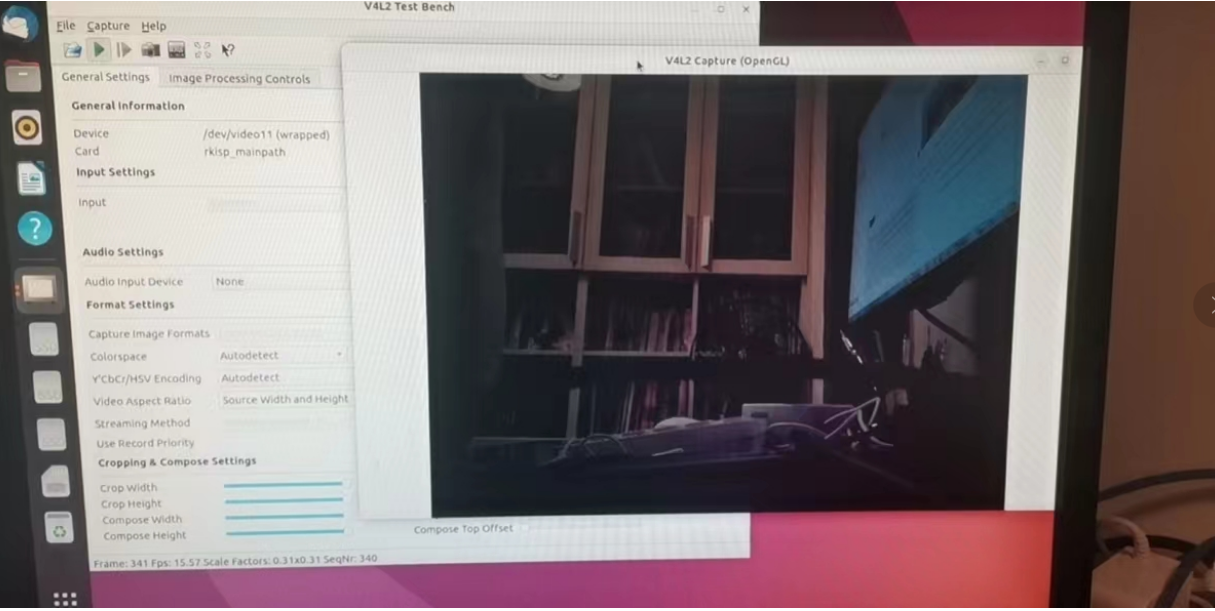
-
-
RE: 今天已经2月中旬了,所以 CM5 啥时候出来?posted in Pi CM5
@jack_admin 那款是定制的MINIPC,CM5的底板是完全重新设计的,接口非常齐全,基本接口下周可以发出来。
-
RE: How to use Coolpi 4b RTCposted in Peripheral
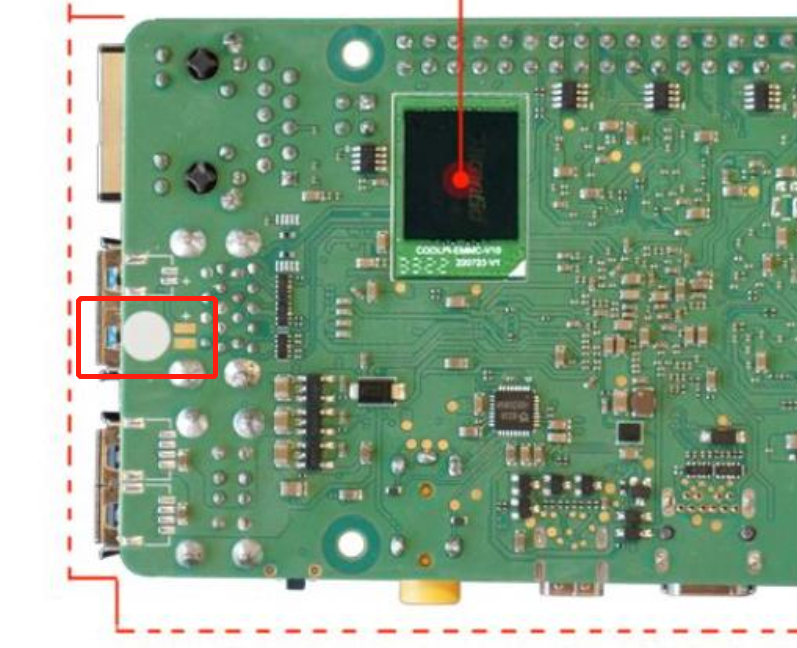
-
RTC spare battery specification MS621FE-FL11E_2017-08-18.PDF
-
Welding position
-